Tuesday, December 29, 2020

Sewer Pipe

 Saturday Night...  I'm fixin' to watch Buck Rogers, working on cleaning up the house after Christmas, making some food, and doing some laundry.  Kim had some issue we needed to talk about, and then I heard the sound of a waterfall.  Water pouring out onto a stone surface.  WTF Batman...  So I went to look for the source of the sound, and it is the toilet.  The toilet was pouring water out of the bowl onto the floor into the study bathroom...

Fucking Yay!  I just love sewage backups, especially on Saturday Night when I'm fixin' to watch Buck Rogers...  I've got this crappy old sewer pipe system that was built in 1978, with iron pipes.  The pipes pretty much disintegrate with oxidation, then are subject to penetration by roots, or just being crushed by the shifting of the house.  Fucking Yay!

Hey!  Lets throw in some collateral problems as well...  I renewed this toilet maybe three, or four years ago, and the hardware is rusted shut.  Yay!  I just love cutting rusted bolts off plumbing, most especially toilets...

I've got a drain auger that I use to clean out sewer pipes.  The screwy thing there is attached to 50 foot long cable.  I push it through the stuck pipe, and it can usually bust the clog.  This time it didn't work...  I went through maybe 35 feet of pipe, very gunky, and didn't open the drain.  So, I'm kinda stuck here at the moment.  I don't know what else to do but call the plumber.  That is going to be very expensive...


Friday, December 18, 2020

West Fence Repair

 I've got this same problem all around the fence.  The old cedar posts have been saturated with water, and are starting to decay.  The lateral forces on the fence panels cause the posts to bend back, and forth right at the base of the post.  Then over tine the post will start to break right where it meets the ground, and will ultimately fail, and break.  When I started this process I had about eight posts that were in this condition.  Here the two posts in the foreground are broken in this manner, but the fence is still standing because of the steel reinforcements I added, and the recently renewed gate section close to the house.

So, there are two things I want to do here simultaneously.  First, repair the broken posts, but also redouble the strength of the fence in general.  At the moment I am concentrating on replacing the broken parts of the fence.  In the near future, after the posts are repaired, I start renewing the fence panels, and integrating my Flow Through Privacy Design where the pickets are spaced apart, and staggered on opposite sides of the fence.


First, I planted the posts in the new locations making sure they are plumb, and level.  I want to have really solid footings for these new posts, so after planting them I leave them alone for several days to make sure the concrete is completely cured before I put any stress on them.  I have experimented with planting posts a lot in the past.  Before I had some novel ideas that didn't work out so well.  This method has worked the best.

Now in this last shot I have removed the braces that were holding the new posts, and attached the fence to them.  Each post is attached to the fence panel with six, 3.5 inch screws.  Now the fence panels have a very solid feel.  They will flex a little, but overall very solid.  Next I am working north along this same part of the fence to the Northwest corner of the fence.


Monday, November 16, 2020

North East Fence Corner 2

 The first post I was working with on this corner seemed to go fairly easily.  The original post had decomposed inside the concrete slug, and the concrete slug was partially intact.  I was able to use this partially intact concrete slug to hold the first post to stabilize this corner.  I had intended to return to this post, finish cleaning out the hole, and then pour a new concrete slug to hold a new post that is square to the rest of the fence.  Easy right?  Not...  Down in the bottom of this hole was the remainder of the concrete slug that was wider at the bottom of the hole.  It was very difficult to remove, and I wound up breaking my shovel trying to remove it.

So it took several hours to finish cleaning out this hole.  After I removed the old concrete I was able to set a new post, and refill the hole with some fresh concrete.  Now the North East fence corner has four fresh posts to support it, and it is solid once again.

This one corner has taken about three days of work, and it is not done yet.  I plan on adding a pressure treated 2x8 footer board to seal the bottom of the panel to the ground.  Then I want to replace the runners with 2x4 pressure treated boards so that all the support structure is pressure treated wood.  Last I want to replace the pickets with pre-stained 6 inch Cedar Boards to make it pretty.  So, maybe another day, and this prototype panel will be done.


Monday, November 9, 2020

North East Fence Corner

 Old Fence...  Big Puppy Sigh...  My Fence was built with Cedar Posts.  While they look nice, they don't last very long.  They seem to break most often where the post meets the ground.  That is where the most stress is.  Lateral forces (wind mainly) push the Fence back and forth, and the place that the Post bends is where it meets the ground.  There are other forces that act on this area as well like the String Trimmer, and ground dwelling Insects.  When the Post breaks at this area usually two Fence Panels are affected because the Fence Panels are joined at the end with a Post.  The end of the Fence Panel is the weakest place to put the Posts.  The ends of the Rails deteriorate first, and it is better to secure the Rails to the Posts in the middle of the Rails.

When you place the Posts at the ends of the fence Panels, each Panel gets half the Post.  This means each Fence Panel get two halves of a Post, or one Post per Panel.  So you get a six foot by eight foot Sail with one Post to hold it.  No wonder they fail right at the point where the Post meets the ground.  When it is windy you could have some significant forces bending your Posts back and forth considerably.  This puts considerable stress not just on the Post, but also the ends of the Fence Rails.

Then this is what you get over time.  The two Fence Posts on this corners are broken at the ground.  The Fence would have fallen over because the ends of the Fence Rails are deteriorated, but I used Steel Joiners to reinforce the joints at the Fence Posts.  The Steel Joiners were a previous reinforcement idea, that worked, but the Cedar deteriorated anyway.  Going forward I am going to use two Posts per Fence Panel attached in the middle of the Panel.  This will double the strength of the Fence to Ground connection.  Also I plan on making a Flow Through design with the Pickets so that air can flow through the fence, but we retain the "privacy" fence design.  I need to draw something to elucidate this.  There will be Pickets on both sides of the Rails which are staggered to block light, but with wide gaps to allow air flow.  The North East Fence Corner is my prototype for this design.  More forthcoming...


Sunday, July 26, 2020

High Country Handyman

I hatched this idea back in 2012.  I was unemployed, and doing odd jobs to get some scratch.  I've always been a DIY Guy, and used to run a Lawn Service when I was a teenager.  So, this kinda stuff comes naturally to me.  There are two reasons for the name.  I was born in Colorado, and it is High Country.  Also I live in the High Country Subdivision in Carrollton, Tx.  I guess I wasn't feeling particularly creative at that time, LOL!  Here is my business card...

Stihl MS180C Chainsaw Rebuild

When something doesn't work anymore it's value drops to zero.  Keep your eyes open because you can find useful stuff that has fallen into disrepair, buy them for almost nothing, or free, and then repair them, and you'll have a good working tool.  I have a need to cut up fallen tree limbs into firewood.  Cutting large tree branches with a hand saw is tedious, and time consuming.  This motivated me to find a Chainsaw for cheap, or free, then do whatever I needed to do to get it working.
I had actually worked on this Chainsaw once before.  I did a minor tune up where I replaced the fuel filter, the air filter, and the spark plug.  It worked for a while after that, and then became very difficult to start, and ultimately wouldn't start.  I assumed that the seals within the carburetor had failed, and the fuel mix was out of tolerance.  The person that owned this chainsaw became convinced that it was just broken, and nothing could be done to repair it, so he wound up giving it to me.
Then it sat on my patio for about four years.  I had interest in repairing it, but had never found the time.  Well, now I have a stack of tree limbs that I need to break down into pieces that will fit into my smoker.  The limbs are Pecan, and Live Oak, and I like Barbeque that is smoked with Pecan, and Live Oak woods.  So, ultimately, the motivation to repair this chainsaw is my appetite for barbeque.
There maybe about a decade of crud built up on the outside of this chain saw.  So, I start with the de-crudification process.  This involves brushing, scraping, spraying, and scrubbing to get all the crud out of the way of the working parts.  I am using Carburetor Cleaner, and Gasoline as solvents to loosen up the crud.  Then I used brushes, paper towels, and compressed air to liberate the crud.
Before I started this process I did a search on U-Tube to find a tutorial on rebuilding Shihl Chainsaws.  That was very helpful in that it showed me everything I needed to do.  Here is a link to the tutorial.  There are two fuel filters that should be replaced.  One is a cylindrical filter in the fuel tank, and the other is a fine screen that is within the carburetor.  I couldn't find a carburetor kit to rebuild the carburetor, but did find a replacement carburetor.  We are going to replace the entire fuel system, except the fuel tank.
This chainsaw had a fuel system problem, most likely within the carburetor, and the correct action is to replace all of the suspect parts.  We have a new carburetor, a fuel line, a tank fuel filter, an air filter, and a new spark plug.  Altogether, maybe about $40 of parts.  You can do this cheaper by getting a carburetor kit if you can find one.
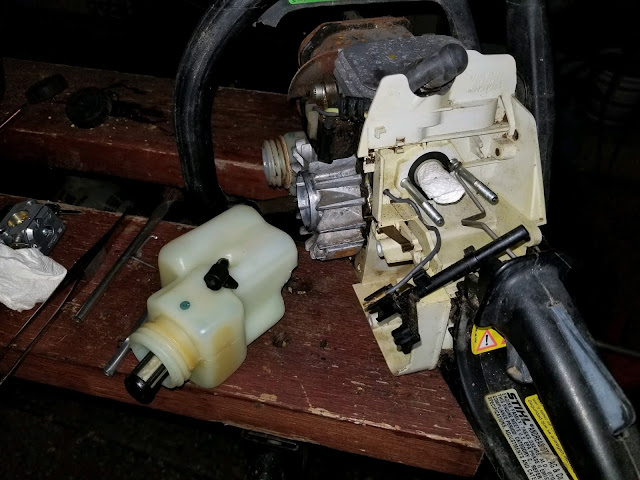
Now I have the whole area cleaned up, and am starting to re-assemble the chainsaw with the new parts.  Here I have cleaned the fuel tank thoroughly, installed the new fuel line, and tank filter.  I am impressed with Stihl's design for this chainsaw.  It is nicely simple, with the lowest number of fasteners possible.  The plastic parts are UV, and solvent resistant, and all seem to be in really good condition for a 10 year old chainsaw.  The one part that was broken was the Chain Brake Lever.
The linkages for the Choke, and Throttle are precisely bent heavy wire that doesn't need any fasteners.  That is exceptional because all of this is really small already, and having fasteners in these areas would require that they be even smaller.  Simple is better, and more rugged.
After the chainsaw was fully assembled I fueled it up with a premium, pre-mixed, 2 cycle fuel designed specifically for Stihl small equipment.  This premium fuel is significant because it does not contain Ethanol.  The seals, and fuel lines in these small power systems do not like Ethanol.  The Ethanol attacks the rubber seals, and fuel line, and causes them to breakdown over time.  So, if you can, only use a premium fuel designed for your small power equipment, and DO NOT use Pump Gas.

Tuesday, May 26, 2020

Monster Flux Suckerz

The new 1.9 Amp fan motor is working great...  It's about 23 Watts, and 200 CFM...
 Adding higher power fan motor caused the fan to walk around the table a little bit.  So, I replaced the Aluminum Baseplate with a nice thick piece of steel that weights 1.25 pounds.  Now it sits still.  I've also improved the regulator assembly a little.  There is a better switch pot, and better knob.
 My Beta Testers are very happy with this one.  Looks like we have a winner...

Friday, March 6, 2020

Nexgen Solder Fan Rev 2

I think I am getting close to finishing this design.  I've got a stronger fan now, 1.9 Amps.  It's kinda noisy at full power, but I think it will work fine at partial power.  Also found a better potentiometer, better terminals.  Then, also the mechanical design is solid.  Lets make copies...