
Sunday, January 22, 2017

Saturday, December 24, 2016
Let It Snow!
Ironically while making a "Let it Snow" sign for the front yard, its 72 degrees in Dallas. We have an old "Let it Snow" sign that is totally done for. It's probably 15 years old, and just falling apart. So, I hatched a plan to replace it. Do ya think I could find a replacement? Not a chance. I probably spent a day finding the parts, and assembling it. But now its done, just in time for a Tropical Christmas.


Looks cooler at night...

Sunday, December 11, 2016
RX300 Windows Tech Brief
There are probably many suitable relays available from several manufacturers. I picked a Panasonic Relay because the RX300 was originally fitted with Panasonic parts. The ACJ2112, available at Mouser Electronics, seemed like the best pick, but there are others that will work in this situation. What you need first is the datasheets for the specific relays that are being cross referenced. The CR2-12V is the original relay, and the ACJ2112 is the replacement. These are excerpts from the datasheets. This is the original CR2-12V Relay...
 You are specifically interested in the PC Board pattern, and schematic of the Relay. This gives you the information about how the relay is wired onto the Door Control Board. Now here is the ACJ2112 part specification.

 Note that the ACJ2112 is considerably smaller than the CR2-12V. Both parts are shown from a bottom view, but we will be using the Dead Bug Technique to wire in the replacement relay, so the connections will be mirrored vertically relative to the CR2-12V part specification drawings, example below. Here is a shot of the Dead Bugged Relay.
 Alright, this is where it gets tricky. You are looking at the top side of the circuit board, so the CR2-12V footprint is mirrored vertically. Then we are going to put the ACJ2112 down, up side down, within the CR2-12V's footprint, with the common contacts oriented to the right, to the window motor. The Normally Open, and Normally Closed contacts go to the power supply side. Then the coil contacts are in the middle.


Ultimately I wound up replacing these with aftermarket boards. There are a lot of cheap Knock Offs now. The first sucked, literally, and would drain the battery. The second worked better, but has a glitchy thing with the locks when I close the driver door. Cheap Knock Off are just that. It would be nice to get some genuine Toyota parts, LOL!


I cropped the schematic diagrams out of the part specifications, and reoriented them to the positions they have in the photo above. Notice the way the common contacts are touching the Normally Closed side of the relay, and how they are both on the top. Here we have aligned the relay switching position. This is how you verify that the up switch will make the window go up, and not down. There are three opportunities here to wire this backwards. The common connections go to the window motor, wire them backwards, and the window works in reverse. Like wise if you wire Normally Open, and Normally closed backwards the window also works in reverse. If you get the control signals to the coils wired backwards the window works backwards. So you really need to pay attention to which wire goes where.
As for wiring, the heavy current wires are Commons, to window motor, and Normally Open, and Normally Closed, which go to the power supply. These wires can carry 20 Amps, so they need to be at least 18AWG, 16AWG would be better if it will fit. I plan on using 18AWG Solid wire to connect the heavy current terminals. Soldering large wire like this will require a soldering iron with enough power to heat the larger mass of the wire, and circuit board. If you are having trouble getting the solder to flow, find a more powerful iron. The solder joints carry current, and need to be flowed correctly. The coil wire, as you can see in the specification above, only carry about 50 milliAmps, so the control wires to the coils can be 24AWG Solid wire. I used a 5 minute epoxy to glue to ACJ2112 to the circuit board.
This Tech Brief takes time, and effort to produce. There is a Donation button at the top of this page, please contribute to my effort to keep Kick Ass Toyotas (RX's specifically) working like they should...

Ultimately I wound up replacing these with aftermarket boards. There are a lot of cheap Knock Offs now. The first sucked, literally, and would drain the battery.

Wednesday, December 7, 2016
RX300 Windows
Victory! I have been trying to repair the intermittent behavior with the RX300 Windows for a long time. Even after identifying the bad part there was a struggle to get a replacement. The trouble is the Power Window Relay in the Door Control Panel. The Relay is worn out, and is intermittent. The obvious thing to do, replace the relay, was problematic in that the part went obsolete in 2010, and the remaining supply is pricey. The original part is a Panasonic CR2-12V Dual 1 Form C Relay, designed specifically to be a power window relay, and PCB mounted to boot. This is the reworked Door Control Board with the new Power Window Relay.
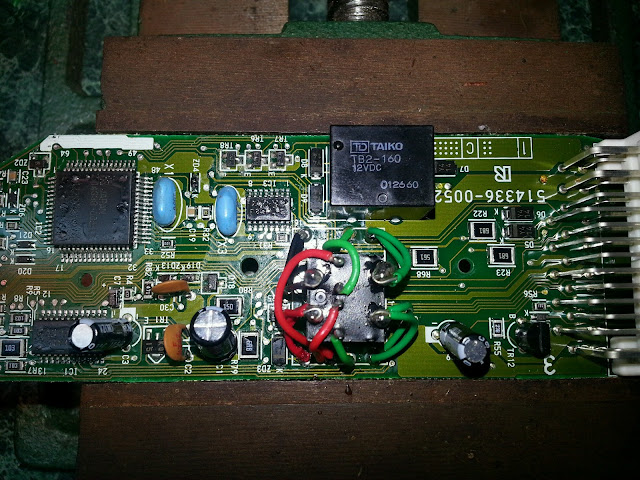 The replacement is a newer Panasonic ACJ2112, Dual 1 Form C Relay, designed specifically to be a power window relay. The good news is that this part is smaller, and easily fits within the footprint of the old part. The bad news is the pin out is not the same, and we'll have to wire the part in, not a big deal. I searched a long time for this part, and it appears to be the right part for the retrofit. The large current terminals on the new relay are oriented the same as the original relay when they are upside down. This means the designers were savvy to the eventual retrofit. Here is a shot of the original relay.
 The original relay is the CR2-12V on the Door Control Board. The replacement ACJ2112 is to the bottom. The circuit board had heavy through holes for the relay, but you want to be careful when you desolder the original relay to avoid damaging the circuit traces. Then I defluxed the board to remove the flux from the solder wick. I compared the datasheets for the CR2-12V, and the ACJ2112 to figure out the right orientation for the new part, so the wires would go down as straight as possible. Then use Epoxy to glue new new relay onto the circuit board, upside down, oriented in the middle of the footprint of the original relay.
 I'm using two 22AWG Solid Core wires for the connections that carry the window motor current. The Coil wires are 24AWG Solid Core wires. I'm gluing the relay down, using solid wire, and making the solder joints as robust as possible in order to withstand vibration. This is an automotive application, lots of vibration occurs, gotta make it hard.
The passenger side window is the worst one in the case of the intermittent operation. So it is the first one that I attempted this repair on. It worked right the first time, LOL! I carefully thought through the replacement using the datasheets for both the relays, got the wires worked out before I started the operation, and double checked my ideas again during the operation. Now I have three more to repair, presently. I bought extra parts to fix more if I need to. Anyone having RX300 widow trouble?
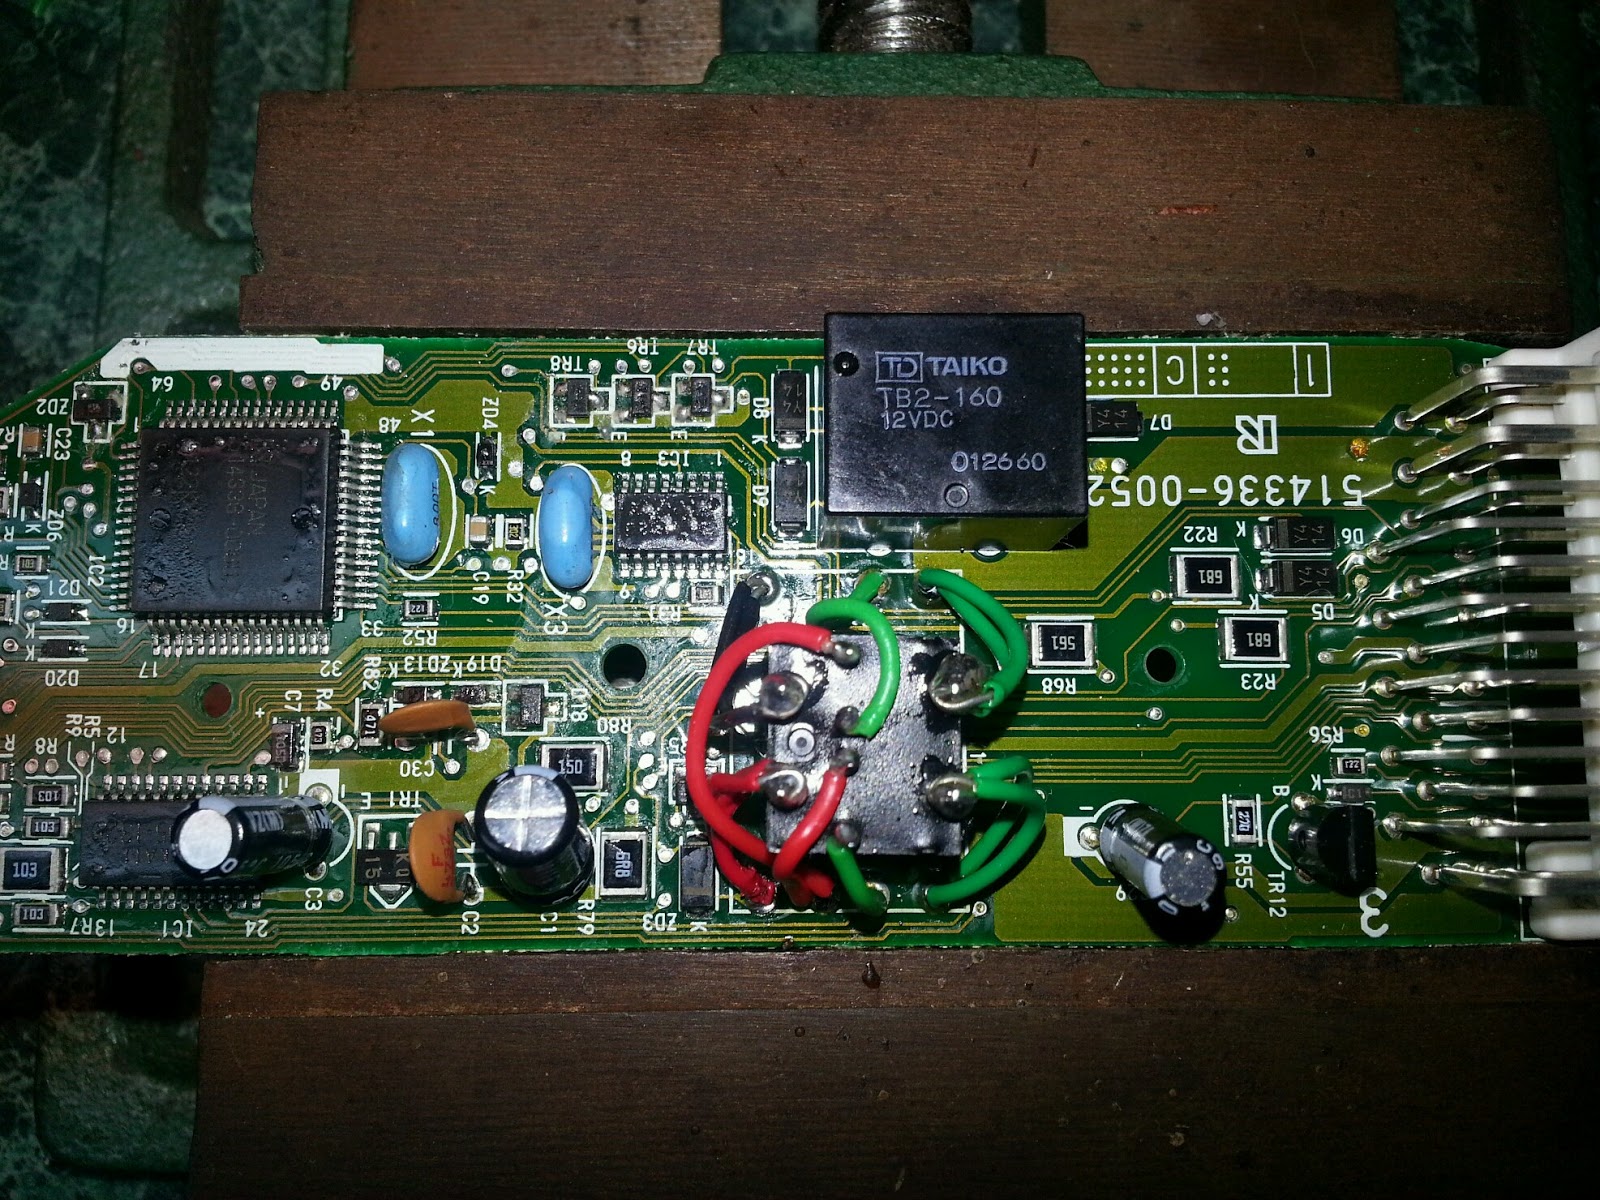

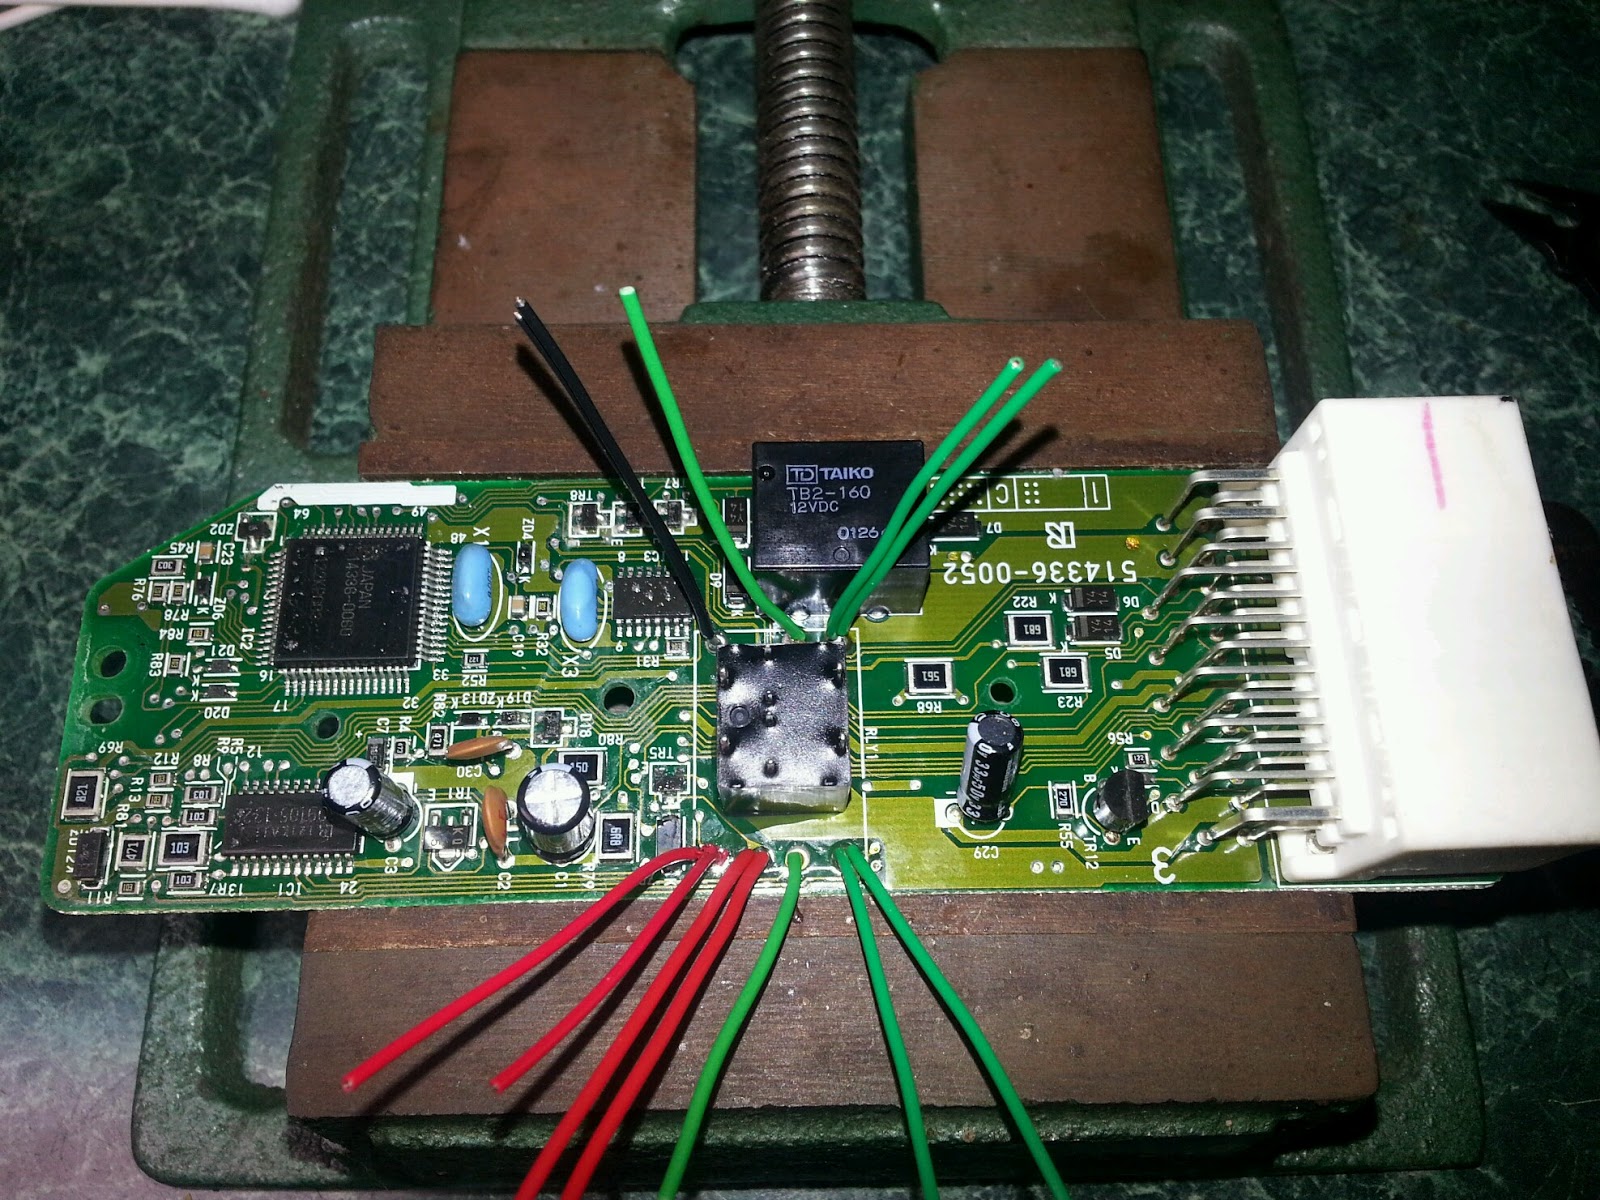
The passenger side window is the worst one in the case of the intermittent operation. So it is the first one that I attempted this repair on. It worked right the first time, LOL! I carefully thought through the replacement using the datasheets for both the relays, got the wires worked out before I started the operation, and double checked my ideas again during the operation. Now I have three more to repair, presently. I bought extra parts to fix more if I need to. Anyone having RX300 widow trouble?
Saturday, November 26, 2016
Truk Restoration
I've been working on a number minor problems on the Truk over the past week. The Auto Rollup feature of the Driver Window wasn't working correctly. There is an intermittent issue with both the front windows which is the Relays that actuate the Window Motors. The Air Mix Servo in the Environmental System wasn't working properly. The front Stabilizer Links were worn out, and making noise. Then some larger issues like Brakes, Struts, and Tires. The impetus that started this effort was the State Inspection, but found a lot of things that needed attention this year.
One thing that I have trouble with for a long time is the Air Mix Servo on the Environmental System. It makes a buzzing sound when trying to switch vent outlets, and never quite gets to the end position. It is a worm drive servo, and the specific part that wears out is the bumper that the worm gear works against. You'd figure they would put a hard surface there, but its just plastic. When the worm gear moves out of its position it looses contact with a drive pin that is on the motors shaft. Then it is skipping in, and out of the worm drive, making that annoying buzzing sound. The fix for this one was to push the worm gear bumper closer to the worm gear to hold it in place. I took a tiny piece of 0.032" aluminum, and made a small spring to hold the worm gear bumper in place. That one works great. At the bottom left of the enclosure, on the left side of the worm gear you can see a gap between the worm gear, and the worm gear bumper. That is the problem. I filled the gap between the bumper, and the enclosure wall to push the worm gear bumper towards the worm gear.

RX300 Windows are unique in their misbehavior. There are times when the window goes down, but will not go up until the window is all the way down. Other times the window goes down, and does not go back up. Then there is another mode where you use the Auto Rollup feature, the window goes all the way up, hits the top, and then rolls down halfway, then only goes down. LOL! that one is the Best! Especially in a Thunderstorm...
This RX300 window system is microprocessor controlled, and networked. The master control talks to the other doors, and problems with the master controller will effect the other door controllers. Sometimes the master door control won't operate windows on the other doors, and you have to use the specific door control. There are a lot of interconnections, and all the buttons are soft switches, and not metallic conductors, thus a little more susceptible to contamination due to low current. The window controllers can get water in them which also causes problems.
The problem with the Auto Rollup was the Window Regulator Motor installation. When you install a new Window Regulator Motor you need to initialize it so that the Auto Rollup feature works correctly. If you skip this step the window motor will never work correctly. To do this you need to electrically hookup the motor, and controller before you install them into the door. They need to be separate from the window regulator. Use the Auto Rolldown switch to run the motor down until it stops. Then use the manual up switch to run the motor up 10 revolutions. Install the motor in the regulator at the middle of the window travel. Install the window regulator into the door. Then you will have to use the manual down switch to move the regulator to the point where you can install the window glass. Once you get the glass back in the door you need to use the manual down switch to roll the window all the way down. Then use the manual up switch to roll the window all the way up, and hold it for 5 seconds after the window closes. Then you can test the Auto Rollup feature before putting the rest of the door back together.
Probably the most annoying behavior of these windows is the intermittent behavior. They can sometimes work perfectly if the phase of the moon, and humidity are correct. They misbehave the most in inclement weather. I've had them refuse to rollup in rain, and freezing weather, and it motivated me to fix it. Turns out this is a worn out relay problem. The contacts on the relays are oxidized, and make intermittent contact. Sometimes works, sometimes don't... The solution here is to replace the relays. The trouble is they are obsolete, hard to find, and expensive when you do.
A couple days later I picked some parts from Ali Express, search for CR2-12V. I should get them in a week or so. Then we can fix that annoying window problem.
Update, Ali Express refused my order because they no longer have stock. The search continues...
I had some rattling noises coming from the front end. I assumed that this was the extremely worn struts, which made plenty of noise on their own. After replacing the struts, this rattling noise persisted. After some exploration I found that this noise was the links on the ends of the sway bar, called a stabilizer bar by Toyota. The ball ends were worn out, and bumping around. That is an off-the-shelf part at the Monster Truk store. So that was a fairly easy fix, four bolts, and the rattling noise was gone.
Probably one of the hardest problems I encountered, one that directly affected the State Inspection was a Check Engine light because of a small leak in the Evaporative Control System. This one has been big trouble, and has taken a lot of time. It is a vapor collection system that stores gas vapors in a charcoal can, then feeds these vapors to the intake manifold periodically. You can hear the engine surge slightly when the EVAP System opens the purge valve. Its basically a vacuum system that gets stretched all over the Truk. Fresh air supply lines go from the air cleaner to the EVAP Charcoal storage can, under the trunk stowage. Then a vapor line goes to the purge valve on the intake manifold. So this vacuum line has stretched across the Truk twice now. Then there is a line that goes to the Gasoline Fill Tube which is sealed by the Gas Cap, a part of the EVAP System. There are a couple other valves, and pressure sensors which monitor the EVAP System. The code my system gave is P0442, small leak in the EVAP System. I think I fix it, then a couple days later the light comes on again... Blarg...
Monster Truk is running a little better now, and got all his papers...
One thing that I have trouble with for a long time is the Air Mix Servo on the Environmental System. It makes a buzzing sound when trying to switch vent outlets, and never quite gets to the end position. It is a worm drive servo, and the specific part that wears out is the bumper that the worm gear works against. You'd figure they would put a hard surface there, but its just plastic. When the worm gear moves out of its position it looses contact with a drive pin that is on the motors shaft. Then it is skipping in, and out of the worm drive, making that annoying buzzing sound. The fix for this one was to push the worm gear bumper closer to the worm gear to hold it in place. I took a tiny piece of 0.032" aluminum, and made a small spring to hold the worm gear bumper in place. That one works great. At the bottom left of the enclosure, on the left side of the worm gear you can see a gap between the worm gear, and the worm gear bumper. That is the problem. I filled the gap between the bumper, and the enclosure wall to push the worm gear bumper towards the worm gear.

RX300 Windows are unique in their misbehavior. There are times when the window goes down, but will not go up until the window is all the way down. Other times the window goes down, and does not go back up. Then there is another mode where you use the Auto Rollup feature, the window goes all the way up, hits the top, and then rolls down halfway, then only goes down. LOL! that one is the Best! Especially in a Thunderstorm...
This RX300 window system is microprocessor controlled, and networked. The master control talks to the other doors, and problems with the master controller will effect the other door controllers. Sometimes the master door control won't operate windows on the other doors, and you have to use the specific door control. There are a lot of interconnections, and all the buttons are soft switches, and not metallic conductors, thus a little more susceptible to contamination due to low current. The window controllers can get water in them which also causes problems.
The problem with the Auto Rollup was the Window Regulator Motor installation. When you install a new Window Regulator Motor you need to initialize it so that the Auto Rollup feature works correctly. If you skip this step the window motor will never work correctly. To do this you need to electrically hookup the motor, and controller before you install them into the door. They need to be separate from the window regulator. Use the Auto Rolldown switch to run the motor down until it stops. Then use the manual up switch to run the motor up 10 revolutions. Install the motor in the regulator at the middle of the window travel. Install the window regulator into the door. Then you will have to use the manual down switch to move the regulator to the point where you can install the window glass. Once you get the glass back in the door you need to use the manual down switch to roll the window all the way down. Then use the manual up switch to roll the window all the way up, and hold it for 5 seconds after the window closes. Then you can test the Auto Rollup feature before putting the rest of the door back together.
Probably the most annoying behavior of these windows is the intermittent behavior. They can sometimes work perfectly if the phase of the moon, and humidity are correct. They misbehave the most in inclement weather. I've had them refuse to rollup in rain, and freezing weather, and it motivated me to fix it. Turns out this is a worn out relay problem. The contacts on the relays are oxidized, and make intermittent contact. Sometimes works, sometimes don't... The solution here is to replace the relays. The trouble is they are obsolete, hard to find, and expensive when you do.
A couple days later I picked some parts from Ali Express, search for CR2-12V. I should get them in a week or so. Then we can fix that annoying window problem.
Update, Ali Express refused my order because they no longer have stock. The search continues...
I had some rattling noises coming from the front end. I assumed that this was the extremely worn struts, which made plenty of noise on their own. After replacing the struts, this rattling noise persisted. After some exploration I found that this noise was the links on the ends of the sway bar, called a stabilizer bar by Toyota. The ball ends were worn out, and bumping around. That is an off-the-shelf part at the Monster Truk store. So that was a fairly easy fix, four bolts, and the rattling noise was gone.
Probably one of the hardest problems I encountered, one that directly affected the State Inspection was a Check Engine light because of a small leak in the Evaporative Control System. This one has been big trouble, and has taken a lot of time. It is a vapor collection system that stores gas vapors in a charcoal can, then feeds these vapors to the intake manifold periodically. You can hear the engine surge slightly when the EVAP System opens the purge valve. Its basically a vacuum system that gets stretched all over the Truk. Fresh air supply lines go from the air cleaner to the EVAP Charcoal storage can, under the trunk stowage. Then a vapor line goes to the purge valve on the intake manifold. So this vacuum line has stretched across the Truk twice now. Then there is a line that goes to the Gasoline Fill Tube which is sealed by the Gas Cap, a part of the EVAP System. There are a couple other valves, and pressure sensors which monitor the EVAP System. The code my system gave is P0442, small leak in the EVAP System. I think I fix it, then a couple days later the light comes on again... Blarg...
Monster Truk is running a little better now, and got all his papers...
Thursday, June 23, 2016
The Do-Rag Incident
I had the bathroom drain get clogged last week, and it went from free flowing to nearly stopped. It was a mystery, inexplicable. I spent several days scratching my head about it, tried drain cleaner, the plunger, even a pipe snake. A few days into this I also noticed one of my Do-Rags was missing. Tuesday night I went and got a drain auger from the Home Labyrinth. Then spent a couple hours augering the bathroom drain. When I pulled the clog out, finally, it was my missing Do-Rag. It came off my head last Wednesday, we estimate, when I went to the bathroom in the middle of the night. I didn't notice it, and it got flushed. I guess I shouldn't sleep wearing the Do-Rag, LOL! I washed it several times, and it cleaned up pretty good. Does that make me a Shithead?


Sunday, May 8, 2016
Flux Suckerz Lite
I received my Carbon Filter material, and have been making filters for the exhaust side of the Flux Suckerz. I've tried a double filter also. One is good, two is a little too much back pressure for the low power fans, but the new fans seem to push through two filters fine. Plus I am trying a new feature. I have put various LEDs on the Flux Suckerz before, but these new ones illuminate the inside of the fan. Its neat, check it out...
 Notice you can't see much light through the Carbon Filter. The two fans on the left have the filter installed, and the fan on the right doesn't. One of my tasks is to cut the rest of the filter material into replacements.

Subscribe to:
Posts (Atom)